- Published on
VSCode + Ubuntu Remote development
手上的老 Mac 已经越来越“步履蹒跚”了,尤其是运行日常工作中维护了两年的一个大项目,CPU 和内存分分钟爆炸。正好公司发的 Thinkpad T14 一直闲置,遂想到利用 VSCode Remote development 的功能将一部份计算和内存压力分离出去,减轻自己 Mac 电脑的负担。
安装 Ubuntu
- 在闲置的 windows 笔记本上划出空闲的硬盘空间,保持为未分配。这里我使用的是
傲梅分区助手。 - 确认 BIOS 模式是 UEFI。
如果不是?我这台笔记本已经是了。 - 确认硬盘分区形式为 GPT。在磁盘管理查看。
- 下载 Ubuntu 20.04 映像文件,使用这个镜像地址下载比较快。
- 下载ventoy启动盘制作工具。
- 插入 U 盘,打开 ventory,制作启动盘,然后将下载好的 ISO 映像文件拖入 U 盘。
- 关闭 BIOS secure boot.
- 设置 BIOS 启动优先级 U 盘优先。
- 启动安装。
详细步骤参考这篇文章 。
Ubuntu 设置
进入 Ubutun 之后,第一件事打开Software updater 升级系统。在安装软件的时候,经常会碰到 unmet dependencies 的问题,一般都是已安装的软件版本太低,或者系统太低导致的冲突问题。所以我们首先升级系统和软件。
升级好后,安装必要的软件。
- openssh-server
sudo apt update
sudo apt install openssh-server
sudo systemctl enable ssh # 开机自启
sudo service ssh start # 启动服务
- Node.js
先安装 nvm,用 nvm 来管理 Node.js 版本
curl -o- https://raw.githubusercontent.com/nvm-sh/nvm/v0.40.1/install.sh | bash

nvm install 22
nvm use 22
- Clash
在 release中下载 clash-for-linux-base.zip 解压后,得到 Country.mmdb 和 Clash 两个文件。
# 解压缩后,移动clash文件
sudo mv ./clash /usr/local/bin/
sudo chmod +x /usr/local/bin/clash

# 添加 clash 配置文件
mkdir ~/.clash
mv ./Country.mmdb ~/.clash

# 设置 clash 启动脚本
cd /etc/systemd/system/
sudo gedit clash.service

# 输入以下服务信息
[Unit]
Description=clash

[Service]
Type=simple
User=root
ExecStart=/usr/local/bin/clash -d /home/你的用户名/.clash/
Restart=on-failure

[Install]
WantedBy=multi-user.target

# 启动服务
sudo systemctl enable clash
sudo service clash start
接下来设置本机网络代理
在settings -> network -> Proxy 中选择 Manual 模式,分别设置
http: 127.0.0.1 port 7890 https: 127.0.0.1 port 7890 socks: 127.0.0.1 port 7891
设置好,就可以打开 这个连接 来查看机场和连接信息,同时验证 clash 是否生效,网络代理是否正确。
感谢开源。
- 安装拼音输入法
sudo apt update
sudo apt install ibus-pinyin
- 设置 Ubuntu 合盖不休眠
sudo gedit /etc/systemd/logind.conf
将 HandleLidSwitch 设置为 ignore,保存然后重启系统。
- git
sudo apt update
sudo apt install git

# 设置 git pull 默认策略为 rebase
git config --global pull.rebase true
# 设置 git editor
git config --global core.editor "code --wait"
VSCode Remote Development
- 设置本机和远端 Ubuntu 的令牌
# 如果本地没有生成 .rsa
ssh-keygen -t rsa -b 4096

# 复制公钥到服务器
# 可以在 Ubuntu 上通过 ip addr show 命令获取局域网 ip
ssh-copy-id user@your_server_ip
设置好后,重启 Ubuntu sshd 服务。
sudo service ssh restart
- 安装 VSCode
remote-ssh插件 - 点击 VSCode 左下角,选择
Add New SSH host, 输入ssh user@your_server_ip即可在 VSCode 上 ssh 登陆到 Ubuntu.
ssh 连接成功后,VSCode 会自动在 Ubuntu 上面安装 code-server, 初始化环境。之后我们就可以打开 Ubuntu 上任意的代码项目,同时 terminal 也是对接到 Ubuntu 环境的 terminal。到这里就可以愉快地进行 Remote Development 了。
其他小问题
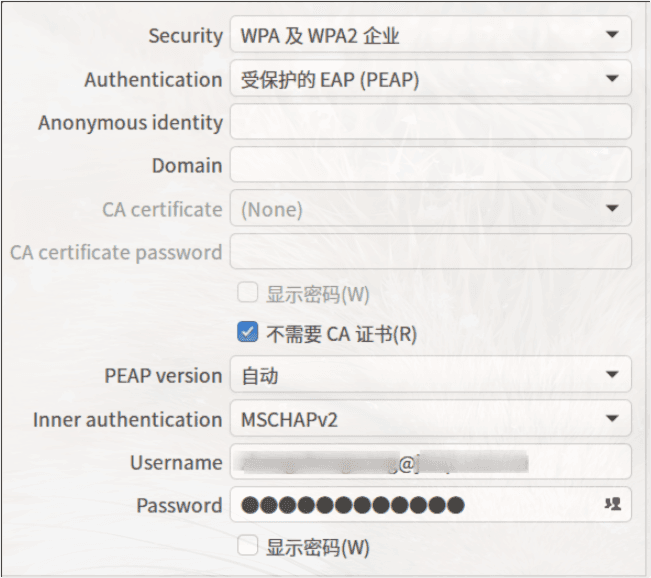
- wifi 连接
公司的 wifi 采用的是 WPS2-Enterprise 安全方式,在 Ubuntu 上面连接没有在 Mac 上那么方便。在 Mac 直接输入 username + password 即可连接。而在 Ubuntu 上需要配置一下
- Git 凭证存储
在 Ubuntu 上面配置了 ssh token 连接,但是对于公司的 remote 仓库一直不起作用,无法连接上, 遂只好使用 HTTPS 的方式。HTTPS 方式的缺点就是每次 git pull push 都要输入用户名和密码,非常麻烦。
好在 Git 自带凭证管理。
# 指定 credentials 的方式和存储的位置
git config --global credential.helper 'store --file ~/.my-credentials'
# 设定用户名和密码
git credential-store --file ~/.my-credentials store

# 接着输入
protocol=xx
host=xx
username=xx
password=xxx

# 之后 git 的操作都会采用上面设置的用户名和密码